May 01, 2019
0

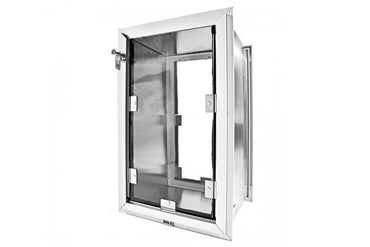
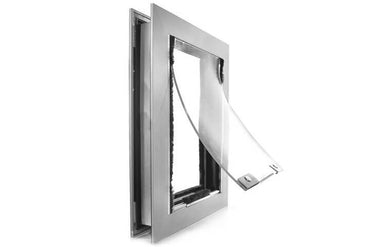
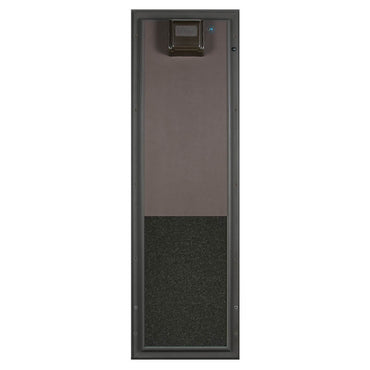
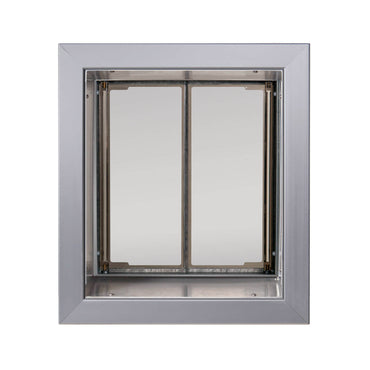
The Endura Flap™ Pet Door is designed to be installed in walls 2"-8" thick and utilizes the best pet door flap in the industry making it the number one choice pet door for extreme weather. The state of the art flap technology gives Endura Flap dog doors the ability to combat 50mph winds and -40 degrees Fahrenheit temperatures. You will not have to worry about energy loss or temperature fluctuation inside your home. If you live in an area with a severe climate, we recommend choosing the double flaps. Designed and built in the USA using environmentally friendly, high insulation value polyolefin polymer flap material to save energy and insulate your home.
Single Flap or Double Flap? The double flap option provides more insulation for your home, perfect for climates that experience extreme hot or cold weather. Recommended for doors that go outside the home. Single flap only is installed on the inside of the door.
| Flap Size | Flap Dimension | Rough Cut Out | Outside Frame Dimension | Flap Type | |
|---|---|---|---|---|---|
| Small | 6" w x 11" h | 8 5/8" w x 15" h | 9 7/16" w x 16" h | Single | |
| 6" w x 10" h | Double | ||||
| Medium | 8" w x 15" h | 10 5/8" w x 19" h | 11 1/2" w x 20" h | Single | |
| 8" w x 14" h | Double | ||||
| Large | 10" w x 19" h | 12 5/8" w x 23" h | 13 9/16" w x 24" | Single | |
| 10" w x 18" h | Double | ||||
| Extra Large | 12" w x 23" h | 14 11/16" w x 27 1/8" | 15 5/8" w x 28" h | Single | |
| 12" w x 22" h | Double |
*Note: Endura Flaps™ are not recommended for use by kittens or very small dogs. Cats have been successful using the Small, however a few have found the Medium difficult to use. We would not recommend using the Large or Extra Large or any of the double flap versions for cats.
Endura Flap assemblies are warranted for a period of 15 years to the original purchaser. Endura Flap assemblies employed in commercial kennels are warranted for a period of 3 years. Damage caused by accident, improper installation, abuse or normal wear, including damage by pets or glass breakage is specifically excluded from this warranty.

There are two measurements to consider when choosing the correct size door for your pet, the following guidelines will help you get accurate measurements. If you get stuck or need any help please contact us, our experts are ready to help.
A - Measure Height – The pet door flaps should be at least an inch or two above the top of your pet’s back not the head. To get this length, measure your pet from the withers (top of the shoulders) to the floor. Remember that your door won’t be placed completely at floor level.
B - Measure Width – Simply measure your pet at the widest point and add an inch or two for safety. If your pet is long-haired, don’t forget that this may make them appear wider than they really are. Alternately, you can open a door just wide enough for your pet to pass through and measure the width of the opening, again adding an inch or two for safety.

Alternate method: You can also make a sample door opening out of a large piece of cardboard based on the above size chart. Place it in a door opening and experiment with height placement. Order the size most comfortable for your pet.
| Flap Size | Flap Dimension | Rough Cut Out | Outside Frame Dimension | Flap Type | |
|---|---|---|---|---|---|
| Small | 6" w x 11" h | 8 5/8" w x 15" h | 9 7/16" w x 16" h | Single | |
| 6" w x 10" h | Double | ||||
| Medium | 8" w x 15" h | 10 5/8" w x 19" h | 11 1/2" w x 20" h | Single | |
| 8" w x 14" h | Double | ||||
| Large | 10" w x 19" h | 12 5/8" w x 23" h | 13 9/16" w x 24" | Single | |
| 10" w x 18" h | Double | ||||
| Extra Large | 12" w x 23" h | 14 11/16" w x 27 1/8" | 15 5/8" w x 28" h | Single | |
| 12" w x 22" h | Double |

We do our best to ship FAST and make it easy for you. At the top of this page, we have noted how long it normally takes to process and ship your order. You can then use the map above to estimate delivery times. We will send you an email confirmation with the tracking number as soon as your order ships
Please see our Shipping Policy for full details.
Things don't always work out, we get it. We'll do our very best to make your return simple and easy. Please email us and we'll provide all the return instructions for your specific item and an RMA number (required).
Please see our Return Policy for complete details.
Tools Required
Please read instructions & notes thoroughly before installation.
Installation Instructions
Step 1: If you have not yet measured your pet, please see sizing tab at the top to ensure the pet door will work.
Tape the provided template onto the wall in the desired location. Use a level to straighten the edges of the template.
The top edge of the cutout should be at least 1 1⁄4" (3,2 cm) above the tallest point of your pet’s back for the single flap, and 2" (5,1 cm) for double flaps.
Step 2: Mark the centers of the four holes using a pencil or nail. Remove the template.
Drill a small hole in the middle to peek into the wall to check for wires/pipes. If you’re clear, move on to the next step to drill through the marked holes.
Professional help is recommended if you are unfamiliar with these processes.
Step 3: Drill the marked 3⁄8” (9,5 mm) holes through the interior and exterior walls. If the drill bit will not go all the way through the wall, you will need to drill through each side separately. (See how on page 6.)
Use a level to make sure your lines will be straight. It is a good idea to remeasure your outline to ensure dimensions are accurate. Then cut the opening out along the lines.
Step 4: Ensure the weather-stripping is firmly pressed in the groove on both frames.
Step 5: Assemble the tunnel onto the interior frame, without bending tabs, to understand how they will fit together.
Trim the four sheet metal tunnel pieces so that they are 1⁄4“ (0,6 cm) shorter than the thickness of the wall. We recommend using a jigsaw, but you could use other metal cutting tools instead.
Be careful to trim the correct side. Do not trim the side of the short tunnel pieces that attach to the top and bottom of the flap frame. Also, do not trim the side of the long tunnel pieces with three small holes in them that attach to the sides of the flap frame.
To reduce vibration, the pieces should be firmly clamped to a piece of wood. See the tips on page 5 for an example.
Step 6: Bend the frame attachment tabs on the two smaller tunnel pieces 90 degrees upward along the perforations.
Be careful to bend the tabs in the right direction. The tabs will break if bent more than once. Single flap tunnel pieces have a joggle (offset). Bend these tabs as shown with arrow. Tunnel pieces for double flap models can be bent once in either direction.
Step 7: Remove the two screws at the top and two screws at the bottom of the Interior Flap Frame (the frame that has a locking cover). If you removed the cover already, the OUTSIDE frame screw holes have threaded nuts in them and you can see them shine.
Attach the smaller tunnel pieces to the top and bottom of the Interior Flap Frame using the two screws.
Step 8: Slide the larger tunnel pieces onto the finger tabs on the small top and bottom tunnel pieces. Bend the finger tabs down as shown. The handle of a screwdriver works well for bending the tabs.
Step 9: Apply a bead of the provided silicone sealant along the inside of the tunnel where it mates with the interior frame, and along the tunnel seams.
Step 10: Place the Interior Frame, with the tunnel attached, into the opening in the wall from the inside of the building. Place the Exterior Frame into the tunnel. A partner can help you hold the Exterior Frame. For really large dogs you may wish to support the bottom of the tunnel with a piece of wood.
Step 11: Insert the threaded rods with the barrel nuts into the four holes in the Interior Frame (the frame that has a locking cover), and screw the threaded rods into the Exterior Frame finger tight. Check that the pet door is level and tighten the threaded rods until the weather stripping compresses fully. Be careful not to overtighten.
Step 12: With the pet door leveled and all four threaded rods tightened, wiggle the end of the threaded rods that are protuding out of the exterior frame until the ends snap off. If the rods are not long enough to grip, you can use a pair of pliers to bend the rods until they snap off.
Step 13: Apply a bead of silicone sealant along the inside of the tunnel where it mates with the exterior frame. In addition to sealing inside the tunnel of the pet door we recommend that you also seal the outside frame around the pet door. This is especially important on the exterior frame to prevent any water from leaking into the wall and causing damage.
Step 14: Tap the hole plugs into the Interior and Exterior Frames. You can use a rubber mallet, wood block and hammer, or a similar non-metal tool.
Tips:
Step 1: Triple check for studs - check the bottom, the middle, and the top where the cut out would be after hanging the template on each edge including the bottom. Check for baseboard height, we suggest the step over be around 3” – 4” (7 cm – 10 cm) when going through walls, so it may be necessary to trim. Step over height needs will vary based on the pet’s size.
Step 2: Before cutting the entire opening make a small square test hole right at the bottom part of the cut out, roughly 6” x 6” (15 cm x 15 cm). Use this to take a peek at the interior of the wall to make sure that there isn’t any wiring, plumbing, etc. This way if you do find any obstructions all you have to do is make a small patch to the wall.
Step 3: You can drill through both the interior and exterior wall, but you need a drill bit that is at least 6” – 12” (15 cm – 30 cm) long. This can be difficult to keep straight and level and having a professional is recommended; a drill with a built-in level would help. An alternative cut method where you cut the inside and outside walls separately is on page 6 (the next page).
Step 4: When installing the weather stripping make sure to not stretch it out, because it compresses over time and you want it to keep the wiggle room.
Step 5: Cut the tunnels one at a time, by clamping them down tightly to a board to avoid vibration. Use a wooden block to guide the jigsaw for a straighter cut.
Step 6: If you do not have a partner to help you guide the rods through the opening to the other frame, you can put your hand through the door and hold a mirror or smartphone facing the hole on the outside to help you see.
Alternate rough cut method:
This method can be easier in some cases than trying to go through both walls with one pass.
» Drill through the interior wall and draw lines connecting the outside part of the holes.
» Use a hand saw or reciprocating saw to cut out the inside sheet rock along the drawn line.
» Remove any insulation to expose the back of the exterior wall. Measuring very carefully and making sure all is level drill holes from the inside of exterior wall to the outside.
» Tape off the inside opening with a trash bag. This will prevent the dust and debris from going all over and makes clean up much easier.
» Make a mark from the inner side of the drilled holes on the exterior wall. It is a good idea to measure and level your outline from the outside, to ensure your hole will be the correct size.
» Use the pilot holes and a circular saw (use a concrete blade if you have concrete or stucco exterior) to cut out the exterior. Place a piece of cardboard under the saw to prevent it from damaging the exterior.
» Finish the opening with a reciprocating saw and if possible have a spotter inside.
SPECIAL WALL SITUATIONS
If your wall is over 8” (20,3 cm) thickness, the included tunnel will not be long enough. Your contractor can install the pet door in thicker walls by fabricating a custom tunnel. This can be done by using plywood, sheet metal, brick, or stone to line the cut out. One frame would be attached to the inside of the house and one frame to the outside. The provided template + instructions might not be accurate in a custom installation. Different hardware* will be required depending on what you are using for the tunnel and how you are mounting the frames to the wall. In all cases it is extremely important to make sure that the tunnel is sealed with silicone or caulking to prevent any damage from water leaking into the wall.
WALL SIDING
You can choose to place the pet door on top of the siding. If you choose this option then you will need to make sure to take care of completely caulking and sealing any gaps that you have to prevent water damage to the wall.
You can also recess the pet door frame into the siding. In this case you would make the recommended rough opening according to the template. Then on the exterior you would cut away the siding only to frame the outside dimension of the pet door. Also be sure to properly caulk and seal around the frame. Some people choose to build a frame to surround the pet door, if you do this, you’ll have to take the same precautions with sealing the wall to prevent water damage.